What should home workout beginners start with? A detailed guide to ‘full-body training’ you can do without equipment🏠

‘I know I should exercise, but I don’t know where to start.’
‘I don’t need to go to a gym, but I want to move my body a little at home.’
I think there are quite a lot of people like that.
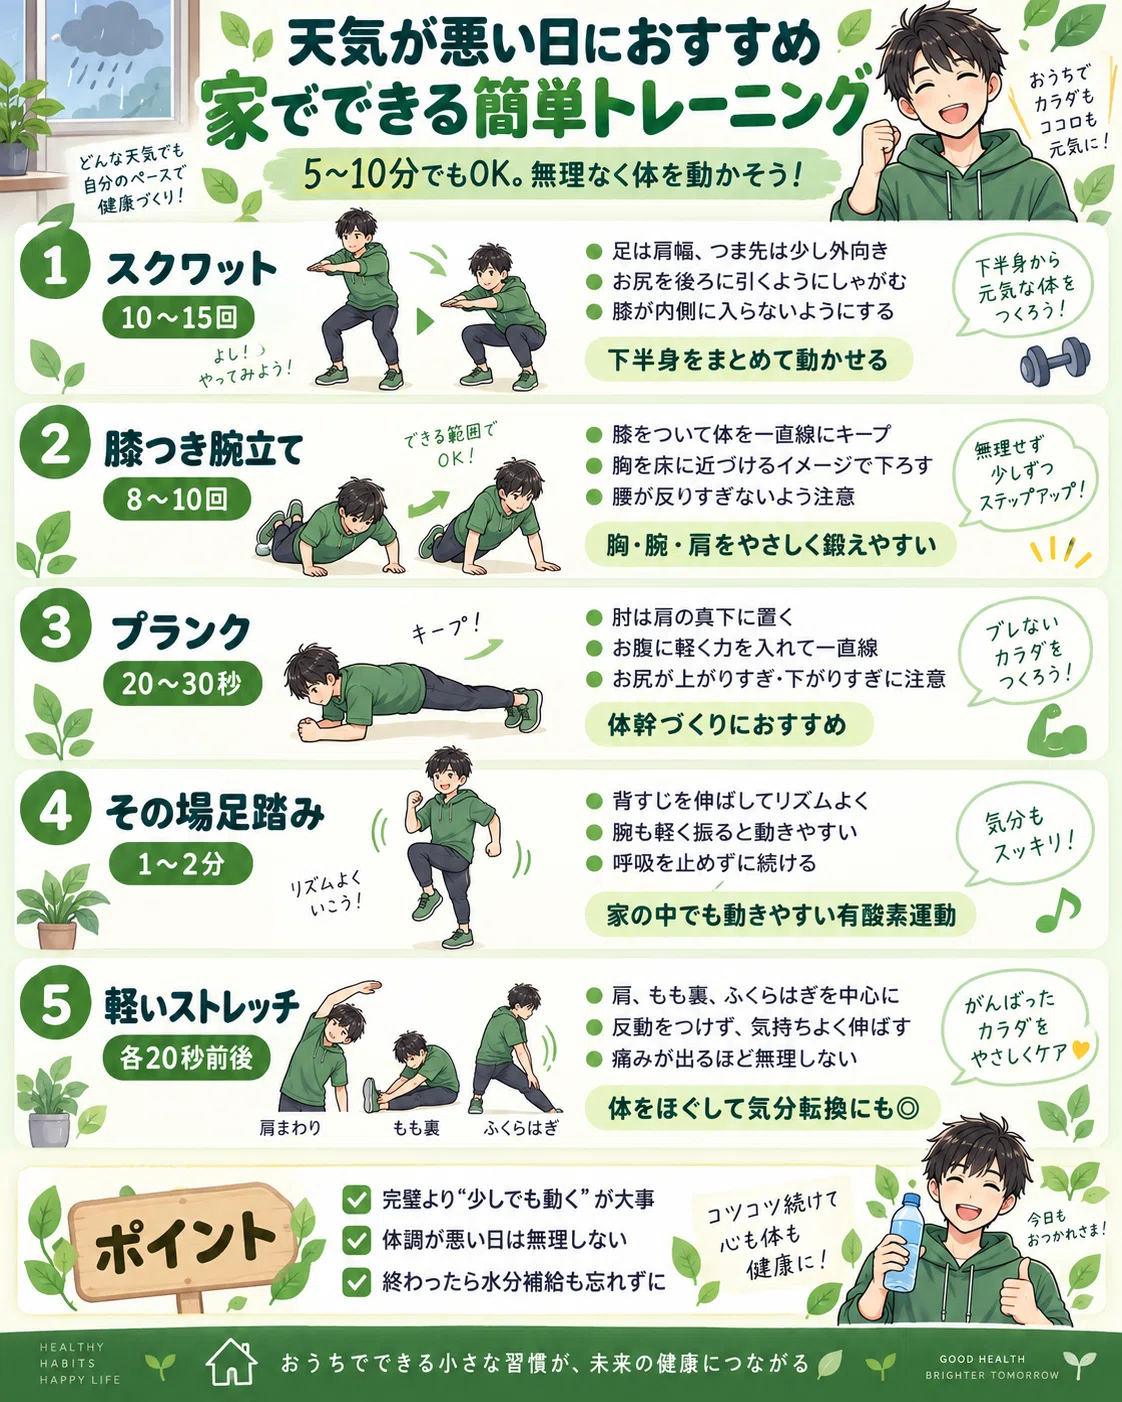
On X, I also introduced some simple exercises you can do at home on days with bad weather:
・Squats
・Knee push-ups
・Planks
・Marching in place
・Stretching
However, when you actually try to start training, there are surprisingly many things you don’t know, such as:
‘How deep should I squat?’
‘How many reps should I do?’
‘Is it okay to do it every day?’
‘Should I do strength training or stretching first?’
‘Do beginners really need to do a 30-second plank?’
So, this time, I’ll go a step further than my X posts and summarize a full-body workout that exercise beginners can safely start at home.
Basically, you don’t need any equipment.
First, instead of trying to do it ‘perfectly,’ let’s start by creating a routine where you can continue exercising for about 10 to 20 minutes🌿
Introduction | Beginners should ‘not try too hard right away’
When you start home training, you’ll want to set goals for reps, like:
‘100 sit-ups every day!’
’50 squats!’
But what’s important at first is being able to repeat the correct movements without strain, rather than the number of reps.
Instead of increasing the number of reps with poor form,
do 8–12 reps carefully → increase the reps or sets once you get used to it
is more than enough.
Also, if you feel strong pain in your muscles or joints, do not continue; stop immediately.
Distinguish between the feeling of muscle fatigue and sharp pain in your joints, etc.
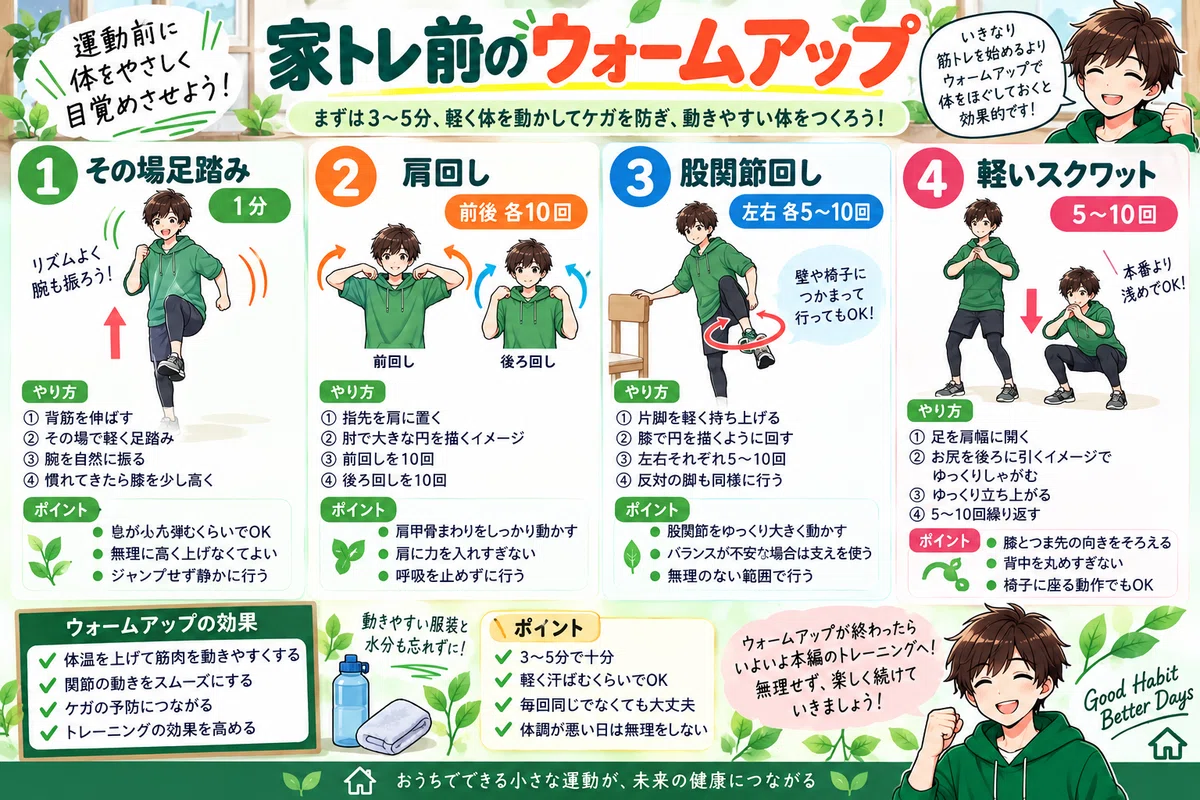
3–5 minutes of ‘warm-up’ before home training
Instead of starting squats right away, first move your body lightly.
Here, the idea is to move your joints while raising your body temperature a little, rather than ‘stretching muscles intensely.’
① Marching in place | 1 minute
Keep your back straight and march lightly in place.
Swing your arms naturally.
Once you get used to it, you can lift your knees a little higher.
It’s enough to get your breath slightly elevated.
② Shoulder circles | 10 times forward and backward
Place your fingertips near your shoulders and imagine drawing large circles with your elbows.
10 circles forward, 10 circles backward.
Move the area around your shoulder blades.
③ Hip circles | 5–10 times each side
Lift one leg slightly and rotate your hip as if drawing a circle with your knee.
It’s okay to hold onto a wall or chair.
④ Light squats | 5–10 times
Shallower than the actual workout is fine.
Repeat the movement of slowly squatting down and standing up.
① Squats | The foundation of the lower body
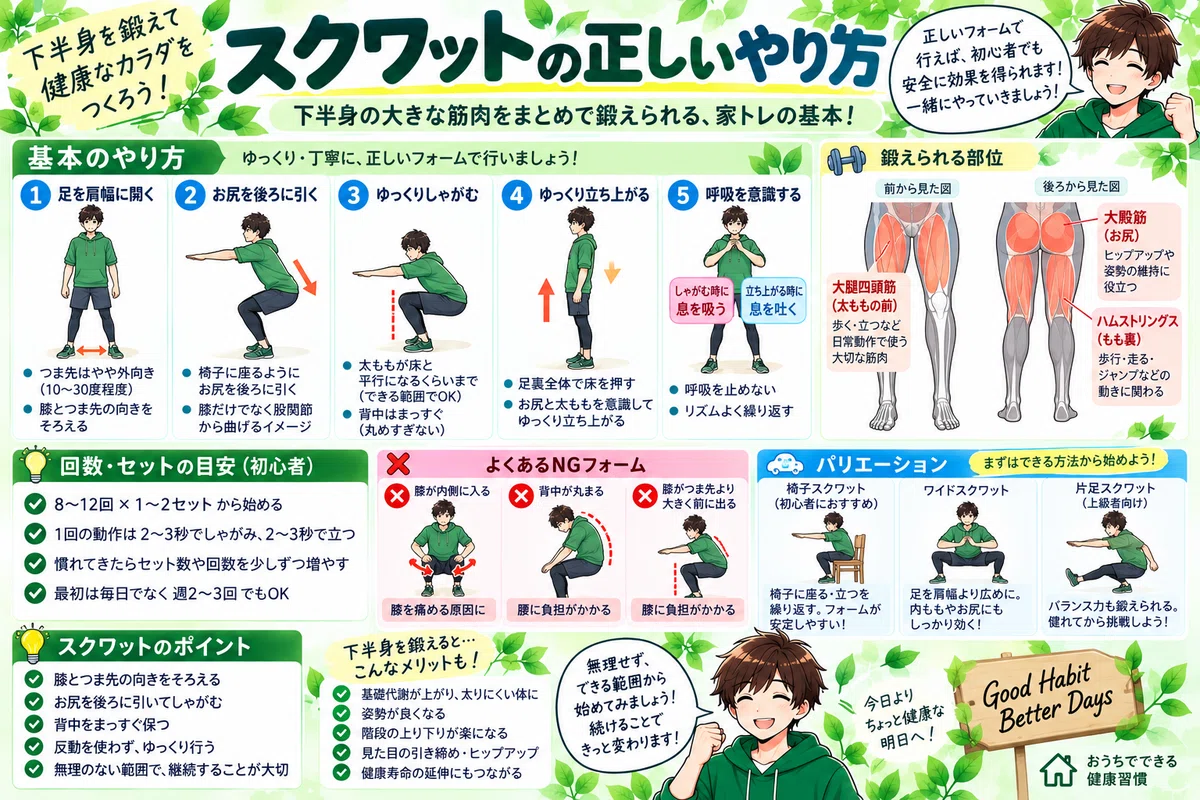
The first thing you want to learn is the squat.
It uses large muscles in the lower body, such as the thighs and glutes, all at once.
Basic form
Open your feet about shoulder-width apart.
Your toes and knees should generally point in the same direction.
From there,
squat down with the image of pulling your hips back as if sitting in a chair.
It’s not about squatting by pushing only your knees forward, but the feeling of bending your hip joints and knees together.
Don’t round your back excessively, and stand up by pushing the floor with your entire foot.
There is no need to follow the rule that ‘you must never let your knees go past your toes.’ Instead, focus on aligning the direction of your knees and toes and moving stably within a comfortable range.
Guidelines for beginners8–12 reps × 1–2 sets
At first, you can place a chair behind you and
repeat ‘sit in chair → stand up’
which is ‘chair squats,’ and that is enough.
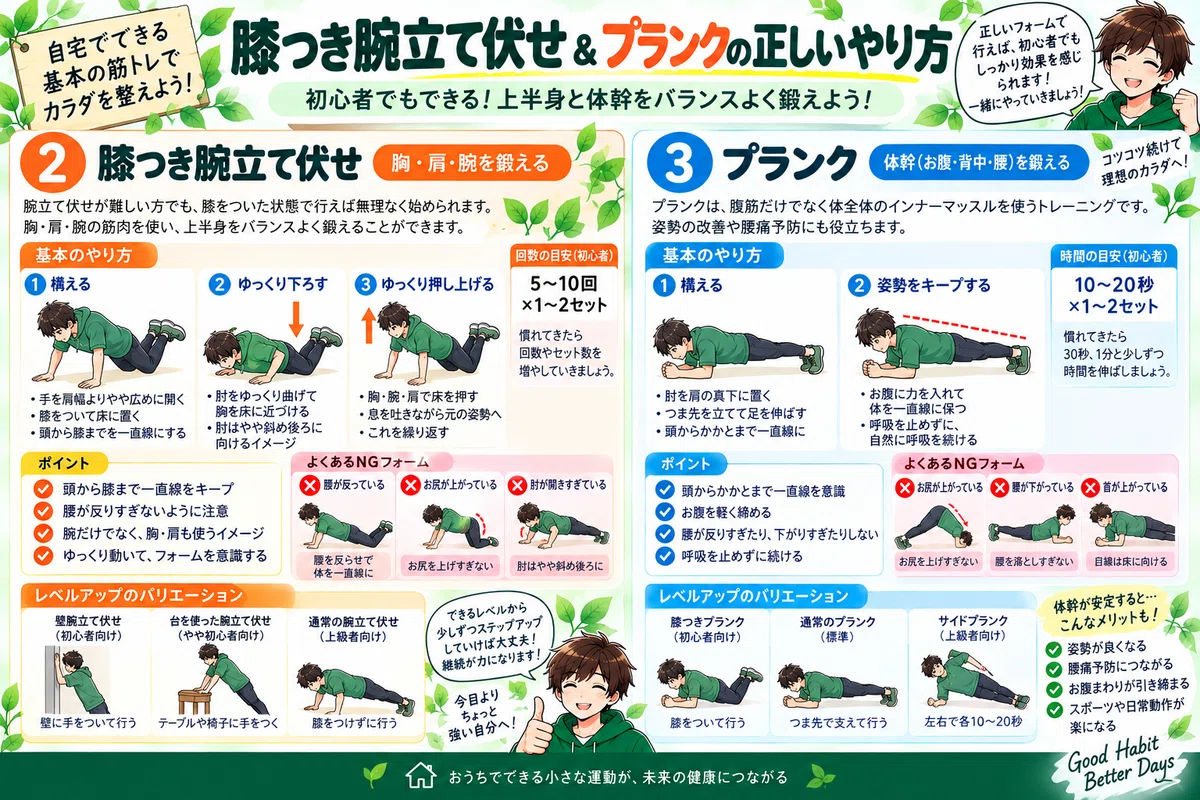
② Knee push-ups | Chest, shoulders, and arms
It’s no problem if you can’t do regular push-ups.
Start from a position with your knees on the floor.
Hands should be shoulder-width or slightly wider.
Keep your body in a straight line from your head to your knees, and bring your chest toward the floor.
The key is
not to try to move up and down using only your arms.
The image is to push the floor using your chest, arms, and shoulders.
Be careful not to let your lower back arch or your hips stay behind.
Guidelines for beginners
5–10 reps × 1–2 sets
If even knee push-ups are difficult, it’s okay to start with wall push-ups by placing your hands on a wall.
Wall → high platform like a table → knee push-ups → regular push-ups
You can increase the difficulty in stages.
③ Plank | Core
Planks are an exercise that uses not only your abs but also the muscles that stabilize your torso.
Place your elbows almost directly under your shoulders and support your body with your toes and elbows.
Keep your body as straight as possible from head to heels.
Common mistakes are:
hips rising too high
lower back sagging too low
holding your breath
These are the patterns.
Especially if your lower back arches too much, don’t force yourself to continue.
Breathe normally while lightly tightening your abs.
Guidelines for beginners
10–20 seconds × 1–2 sets
You don’t need to endure for a minute from the start.
It’s better to stack up 10–15 seconds of good form than 30 seconds of broken form.
It’s also okay to start with a plank with your knees on the floor.
④ Hip lifts | Glutes and hamstrings
I didn’t include this in the X post, but it’s an exercise I want to add for the note version.
Lie on your back, bend your knees, and place your feet on the floor.
From there, lift your hips.
The image is to lift while tightening your glutes, rather than arching your lower back significantly.
Hold for about 1 second at the top, then lower slowly.
Guidelines for beginners
10–15 reps × 1–2 sets
Since you can use your glutes and the back of your thighs in a different way than squats, it’s an exercise that’s easy to combine.
⑤ Bird-dog | Core and posture maintenance
Get on all fours.
From there,
extend your right arm + left leg
slowly.
Once you return,
left arm + right leg.
The point is not to lift your hands and legs high.
It is to keep your torso as still as possible.
Perform within a range where your lower back doesn’t arch significantly and your body doesn’t tilt left or right.
Guidelines for beginners
5–10 reps each side
It’s a core training exercise that’s easy to incorporate even for those who are not good at planks.
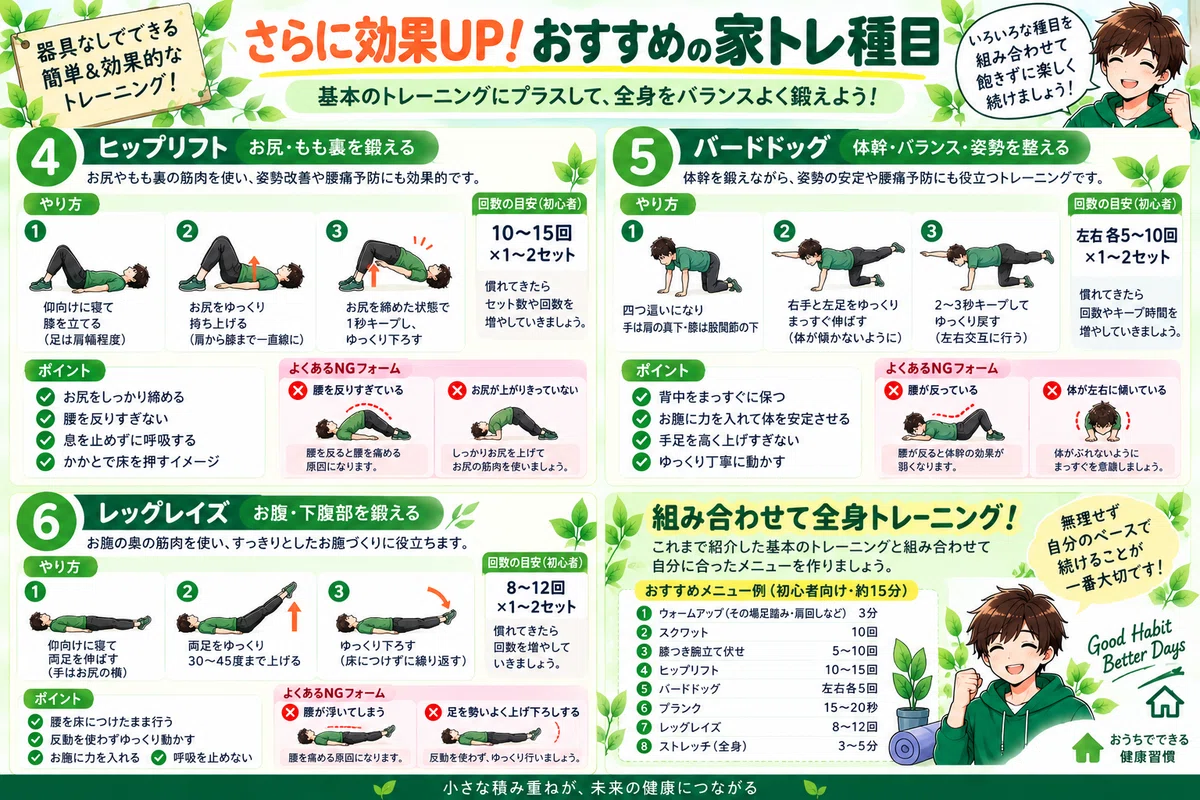
⑥ Marching in place | Aerobic exercise you can do at home
In addition to strength training, combine it with light aerobic exercise.
March rhythmically in place.
Swing your arms naturally, and once you get used to it, lift your knees a little higher.
Guidelines for beginners
1–3 minutes
It’s okay to do it while watching TV or videos.
If you are concerned about noise in an apartment, etc., don’t jump; place your feet quietly.
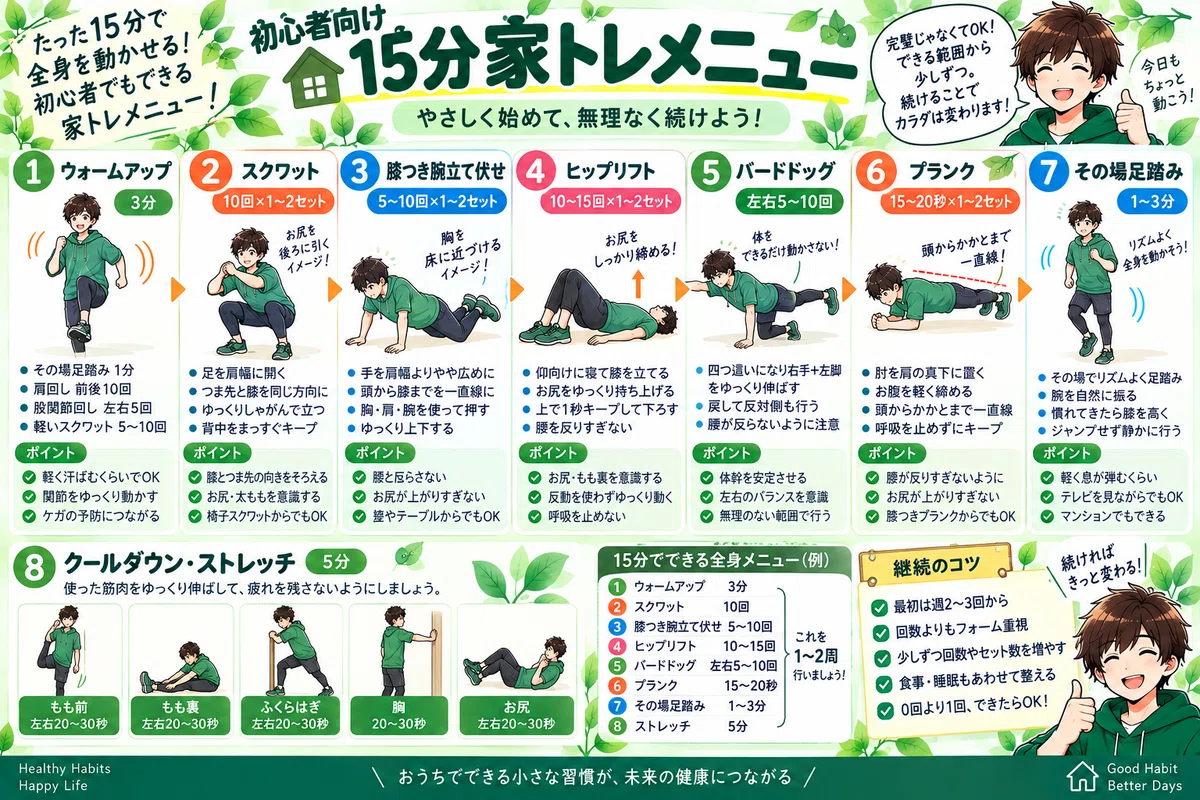
15-minute home training menu for beginners
You don’t need to do all of this.
At first,
Warm-up 3 minutes
↓
Squats 10 reps
↓
Knee push-ups 5–10 reps
↓
Hip lifts 10 reps
↓
Bird-dog 5 reps each side
↓
Plank 15–20 seconds
↓
Marching in place 1 minute
Do this for 1–2 rounds.
It’s fine to rest for about 30–60 seconds between exercises.
Once you get used to it, increase one of the reps, time, or sets little by little.
The point is not to increase everything at once.
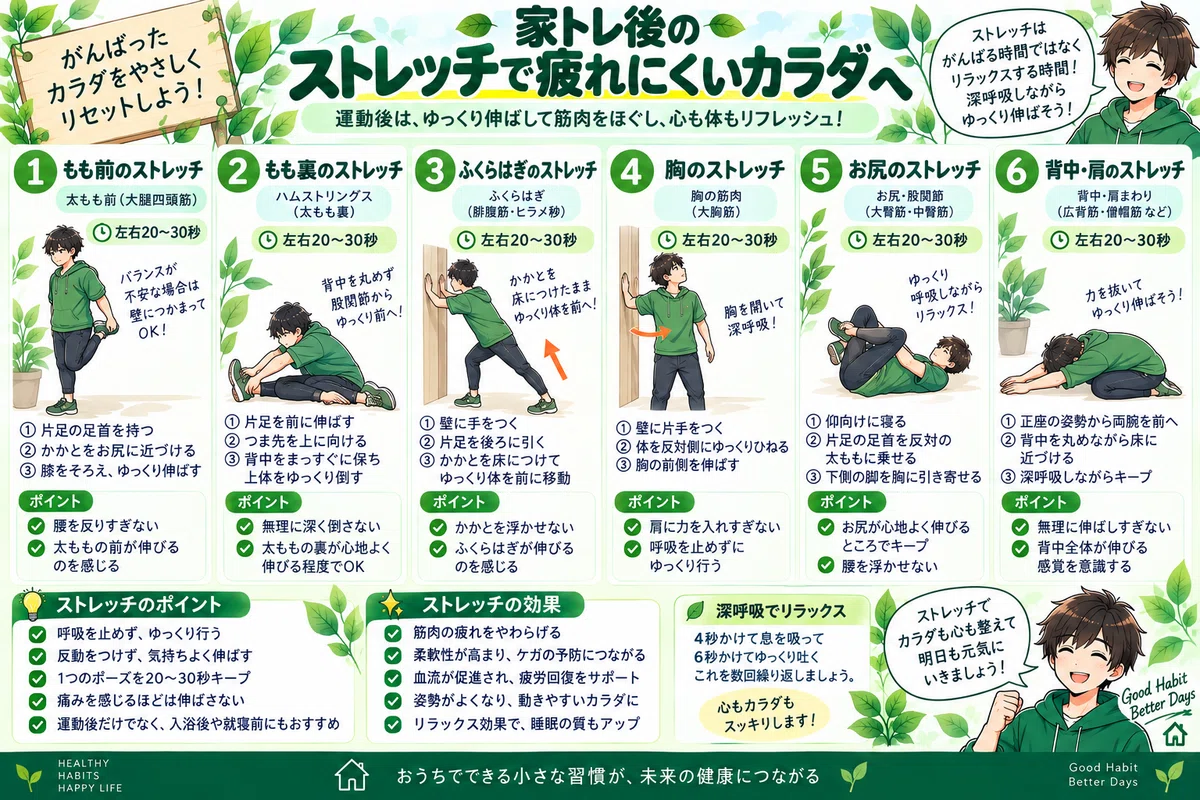
5 minutes of stretching after strength training
After training, stretch slowly while regulating your breathing.
Here, do not use momentum; just stretch to a point where it feels good.
① Front of thighs | 20–30 seconds each side
While standing, hold one ankle and bring your heel toward your glutes.
Don’t let your knees spread too far apart, and don’t arch your lower back too much.
If you are worried about balance, hold onto a wall.
② Back of thighs | 20–30 seconds each side
Extend one leg forward and lift your toes.
Instead of rounding your back and lowering your head, the image is to tilt your upper body forward from the hip joints.
It’s okay if the back of your thigh stretches lightly.
③ Calves | 20–30 seconds each side
Place your hands on a wall and put one leg back.
While keeping the heel of the back leg on the floor, move your body slightly forward.
④ Chest | 20–30 seconds
Clasp both hands behind your back or place one hand on a wall and slowly turn your body in the oppohttps://gymforcestore.com/ direction.
Stretch the front side of your chest.
⑤ Glutes | 20–30 seconds each side
Lie on your back and place one ankle on the oppohttps://gymforcestore.com/ thigh.
When you bring the lower leg toward your chest, the area around your glutes will stretch.
There is no need to stretch until it hurts.
‘A little pleasant’ is enough.
Should I do it every day?
If you are a beginner, you don’t need to do intense strength training every day from the start.
There is a way to start with strength training about 2–3 times a week.
On days you don’t do strength training,
walking
light marching
stretching
move your body with these.
For example,
Mon: Home training
Tue: Walking/stretching
Wed: Rest
Thu: Home training
Fri: Walking
Sat: Home training
Sun: Rest
Even this is enough to get started.
What’s important is being able to continue for weeks or months, rather than ‘doing it perfectly for 7 days.’
How do I make it harder once I get used to it?
If you keep doing the same exercise, it will gradually become easier.
This is not a bad thing; it’s a sign that your body has adapted.
In that case,
increase the reps
increase the sets
move slowly
widen the range of motion slightly
advance to more difficult exercises
you can increase the load with these.
For example, for squats,
chair squats
↓
regular squats
↓
slow squats
For push-ups,
wall
↓
high platform
↓
knee push-ups
↓
regular
It feels like this.
‘One more rep than yesterday’ is also a great step forward.
If I’m dieting, will I lose weight just by doing home training?
Home training is useful for building physical strength and maintaining or improving muscle strength.
However, dieting is not determined by exercise alone.
It is important to organize your diet, daily activities, sleep, and exercise together.
Just because you did strength training, you don’t need to drastically reduce your subsequent meals.
Conversely,
‘I can eat anything because I exercised’
is also not true.
What I have always valued in my health log is,
adjusting little by little while eating.
I think home training is the same🌿
Summary | The first goal is ‘continuing,’ not ‘perfect strength training’
For beginner home training,
① 3–5 minute warm-up
② Squats
③ Push-ups
④ Hip lifts
⑤ Bird-dog/plank
⑥ Light aerobic exercise
⑦ Stretching at the end
You can move your whole body with just this.
You don’t need to do 30 minutes or an hour from the start.
Just 10 squats today.
It’s okay to have days like that.
If you were able to do 10 reps on a day you would have done 0, that is also a change.
Even on days when the weather is bad or you are too busy to go outside, you can start from a few minutes at home.
Instead of ‘I have to exercise,’ try ‘Let’s move my body a little.’
Let’s start from there and make it a habit little by little🏠🌿
⸻
Protein to be conscious of along with training
I have introduced training methods so far, but what I want you to be as conscious of as exercise is your daily diet and protein intake.
Meat, fish, eggs, soy products, etc.—it is recommended to get it from your regular diet basically. However, on busy days or after training, when it is difficult to get enough from meals alone, using protein as a supplement is one way.
What I value when choosing protein is,
* Taste that is easy to continue
* Being able to easily supplement protein
* Being easy to drink even with water
* A price that is easy to continue without strain
Around here.
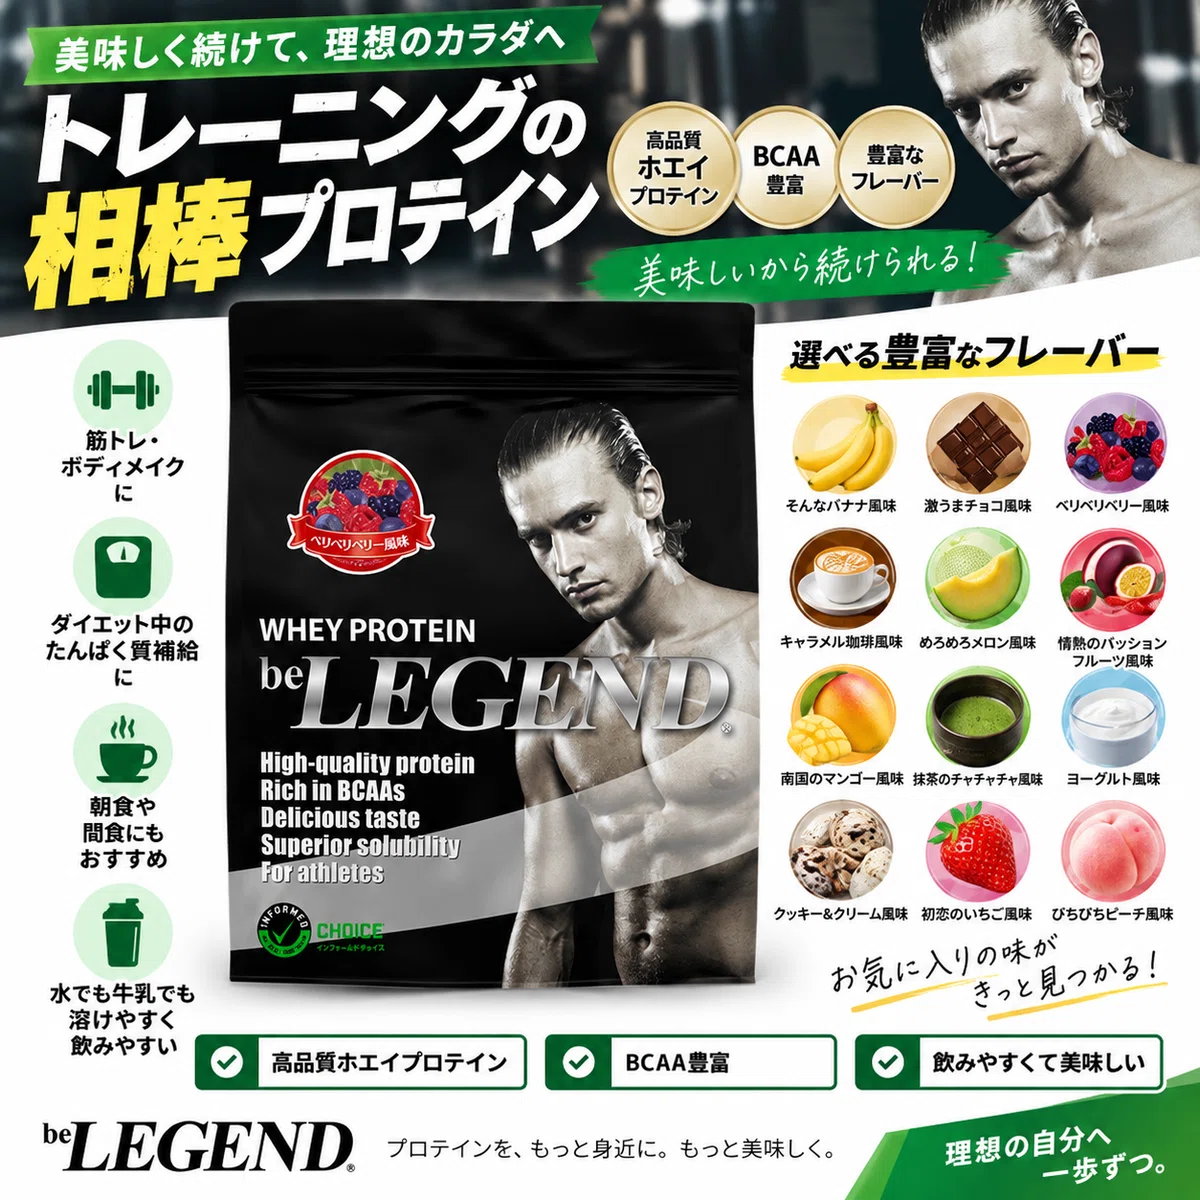
One of the candidates for that is Be Legend’s whey protein💪
There are quite a lot of flavor types, so it is attractive that there are many choices even for people who say, ‘I get tired of the taste of protein and can’t continue.’
For strength training, it is important to continue exercise, diet, and rest without strain, rather than trying hard once.
Along with the training introduced this time, please try to be a little conscious of your daily protein amount too🌿
👇Click here for the protein introduced this time
Personally, I like the taste and drink various kinds!
https://room.rakuten.co.jp/room_0dd6b21ff8/1700393901413219%0A%0A%E2%80%BBThis article includes PR.
Click here for soy protein for dieting🥤
https://room.rakuten.co.jp/room_0dd6b21ff8/1700392893017130